(Enlarge)
|
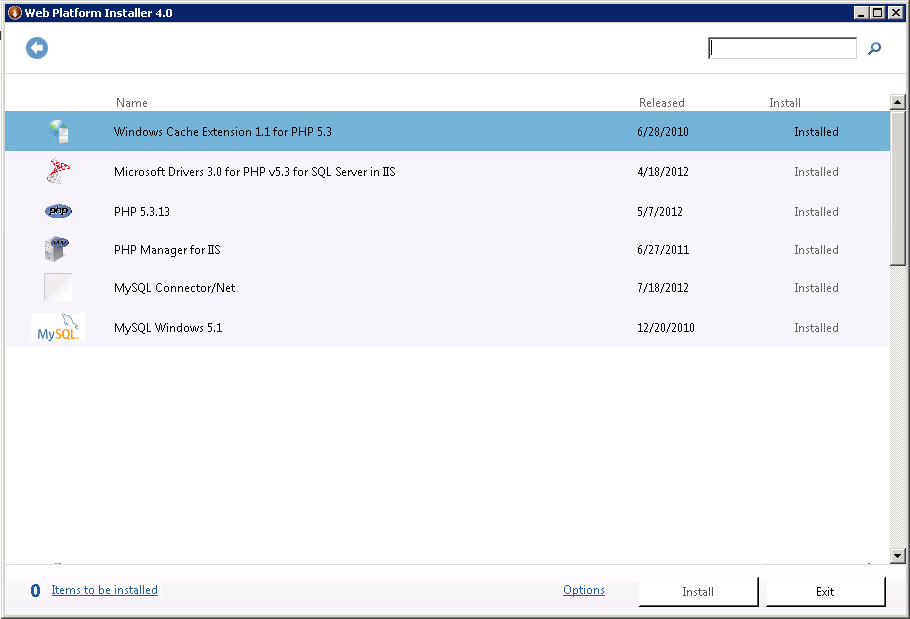
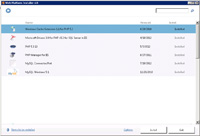
- Installing php and mySQL via the Web Platform Installer 4.0 is as simple as locating the items to install and then installing them:
- PHP Version 5.3.13
- mySQL Windows 5.1
|
(Enlarge)
|
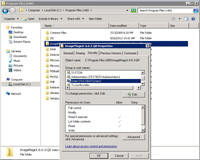
- Installing Imagick (the application) is also straight-forward:
- [Application] ImageMagick Version 6.6.3-0 2010-07-01 Q8 (ImageMagick-6.6.3-0-Q8-windows-dll) - find and download here
- [DLL for Php] php ImageMagick NTS (php_imagick_nts.dll renamed "php_imagick.dll" and put into Php's "ext" folder) - find and download here
- As shown by the screenshot, you should not need to modify any permissions on the application itself for it to function
|

(Enlarge)
|
- Many of the functions of Imagick should work fine (such as dynamic image creation) in Php
- However, I discovered that, as soon as I attempted to work with physical image files, errors were generated.
|

(Enlarge)
|
- The specific error received from Imagick through Php was the following:
- PHP Fatal error: Uncaught exception 'ImagickException' with message 'Empty input file 'C:/Windows/TEMP/magick-...
|
(Enlarge)
|
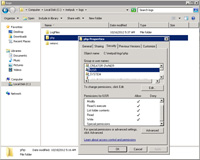
- In order to keep Imagick from erroring out, the IUSR account must be given access to the Windows Temp folder with a minimum of READ & execute, LIST FOLDER CONTENTS, READ
- NOTE: You should not need to provide Write/Modify permissions to the IUSR account depending on what you've got going on
|
(Enlarge)
|
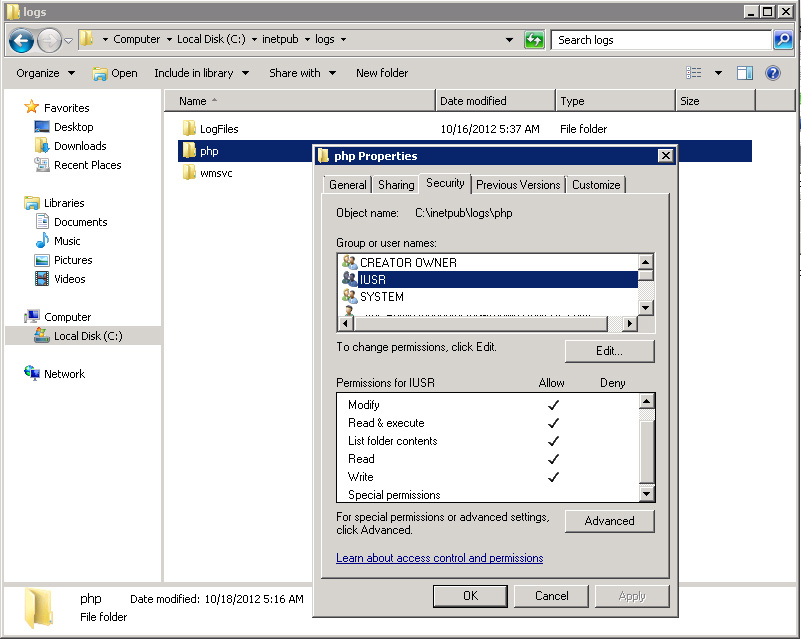
- When you are ready to switch to production, you will want to ensure that any errors are logged instead of being sent back to the web browser.
- Unfortunately, when you select production, you are not finished (no error logs will ever be generated). The IUSR has to be added to the logging folder.
|
(Enlarge)
|
- Add the IUSR account to wherever you have pointed the PHP error logs to.
- You may wish to experiment with permissions as shown to see what the minimum set of permissions are that allow the IUSR to create, write and modify logs.
|
(Enlarge)
|
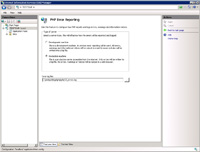
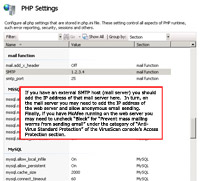
- PHP has a mail function. However, in order to use the mail function you need to configure it as shown (this example is for having mail sent from a separate SMTP server).
- Although minor, for security, you may wish to set "mail.add_x_header" to "Off" so that PHP mail header information and application name is not embedded in mail that PHP does send out.
|

(Enlarge)
|
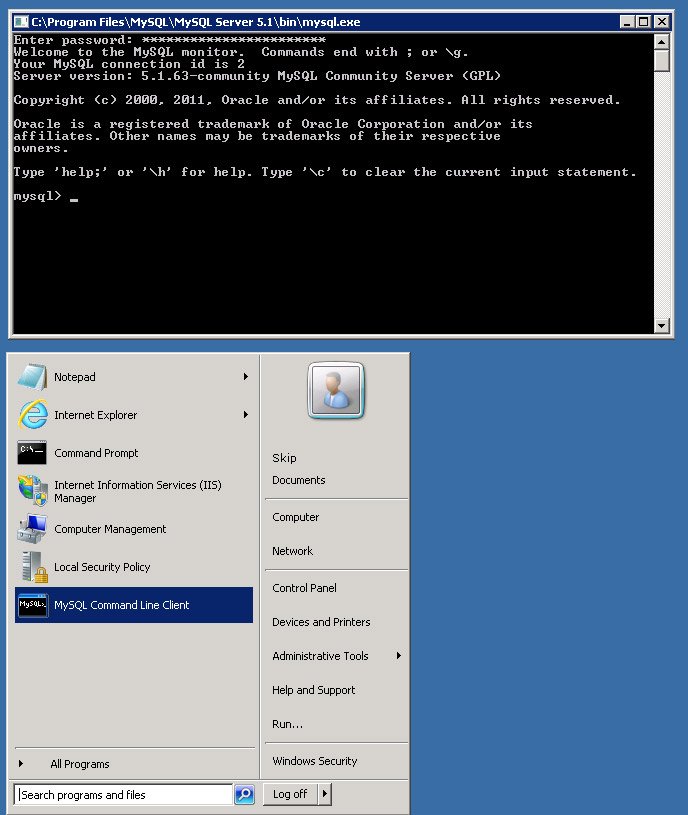
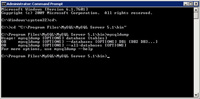
- Starting a "mySQL" command-line session is simple as shown by the screenshot.
|
(Enlarge)
|
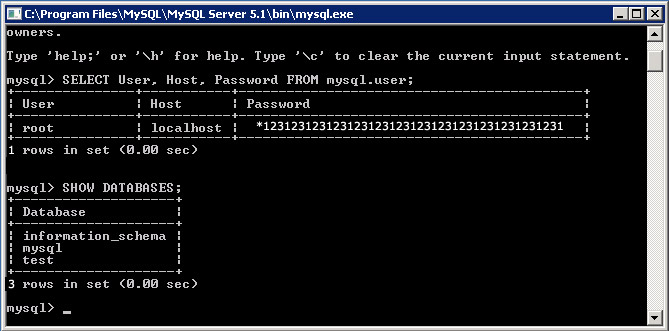
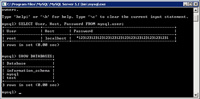
- Some installs of mySQL add additional database user accounts that are not needed and, in some cases, without passwords being set. You sure don't want to have that going on. Here's how to tell:
- SELECT User, Host, Password FROM mysql.user;
|
(Enlarge)
|
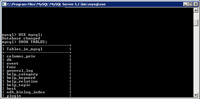
- You may also want to make sure that no extra tables exist...such as a 'test' database. The one's that should be created by default include "information_schema", "mysql", and, "test" (this database should be empty).:
- SHOW DATABASES;
|
(Enlarge)
|
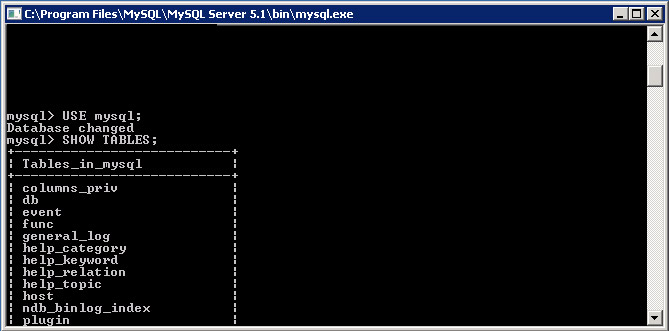
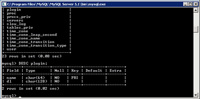
- You can enter into a specific database:
- USE mysql;
|
(Enlarge)
|
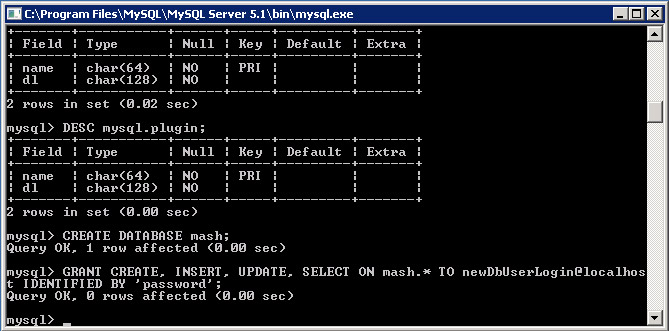
- After entering into a database (by USE), you can see the layout of tables:
- DESC tablename; OR optionally DESC database.tablename;
|
(Enlarge)
|
- Creating a new database is simple:
- CREATE DATABASE mash;
|
(Enlarge)
|
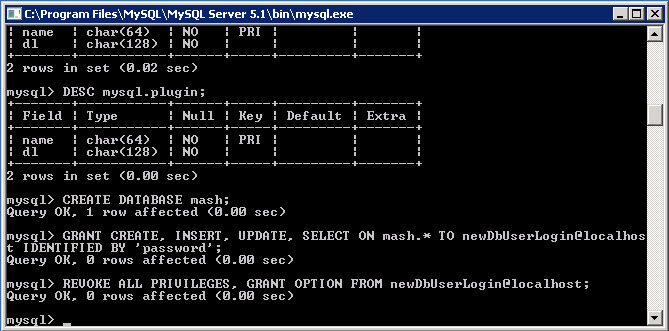
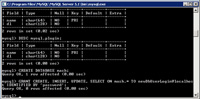
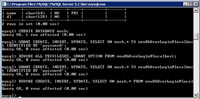
- You can also create/assign a database user account to the database. NOTE: If a database user account does not exist at the time you are assigning the account to a database, mySQL will automatically create the user account for you (messing with a proper insert into the user table can be confusing given all the different versions of mySQL out there). Whether creating or adding you do NOT need to 'encrypt' the password - ie, use the "password('')" syntax:
- GRANT CREATE, INSERT, UPDATE, SELECT ON mash.* TO newDbUserLogin@localhost IDENTIFIED BY 'password';
|
(Enlarge)
|
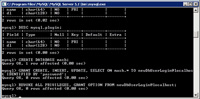
- You can also revoke the privileges a database user account has:
- REVOKE ALL PRIVILEGES, GRANT OPTION FROM newDbUserLogin@localhost;
- Optionally, if you only want to revoke permissions to a specific database you could use:
- REVOKE CREATE, INSERT, UPDATE, SELECT ON mash.* FROM newDbUserLogin@localhost;
|
(Enlarge)
|
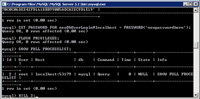
- To ensure the database user account has no privileges you can check:
- SHOW GRANTS for newDbUserLogin@localhost;
|
(Enlarge)
|
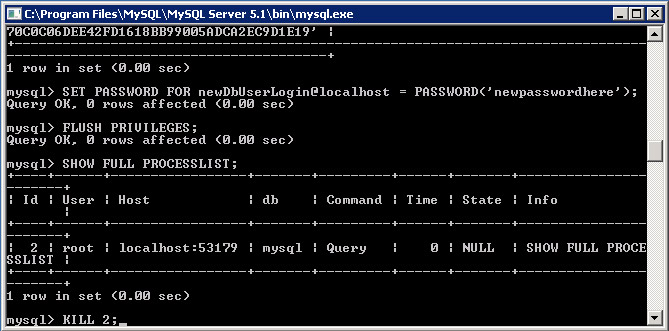
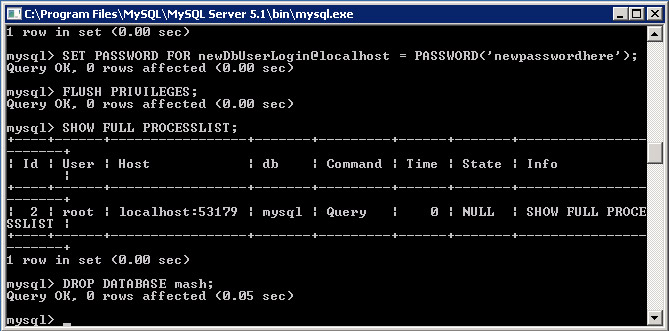
- You may also need to change the password of a database user account:
- SET PASSWORD FOR newDbUserLogin@localhost = PASSWORD('newpasswordhere');
- Because you are not using the GRANT command, in order for the password change to take effect, you must perform a FLUSH:
- FLUSH PRIVILEGES;
- Finally, you could even remove the database user account entirely:
- DROP USER newDbUserLogin;
|
(Enlarge)
|
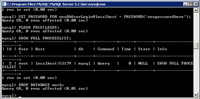
- If the new user had already invoked some sort of activity with mySQL (such as running queries), the user will remain active even though you have performed a DROP; this is unfortunate if there is nefarious activity going on. You could restart the mySQL service (via service mysqld restart or /etc/init.d/mysql restart) or, if that is not feasible, KILL the process attached to the new user (the new user will have a unique ID that you use).
- SHOW FULL PROCESSLIST;
- KILL 2; (2 is the processid of the database user account to stop)
|
(Enlarge)
|
- Deleting a database is straight-forward:
- DROP DATABASE mash;
- Speaking of DROP you can also DROP tables of a database. However, be sure that there are no foreign key constraints (that is, the table that you want to drop does not have a foreign key in it which is pointing to another table that still exists). The syntax for dropping a table is DROP TABLE mash.tableName;
|
(Enlarge)
|
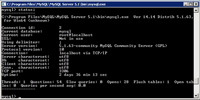
- Sometimes you may need to know the status of mySQL (or perform a stop, start, restart):
- status;
|
(Enlarge)
|
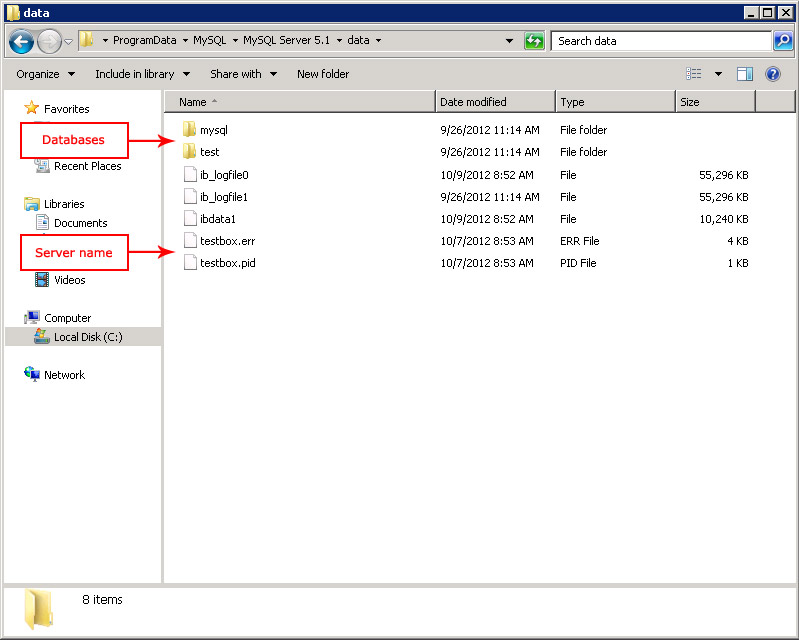
- If you need to be concerned with backing up the mySQL databases, by default they would be located as shown by the screenshot.
- ** See the information further down this page to see how to use a batch file to perform database backups **
|

(Enlarge)
|
- You could, alternatively, use the mySQL tools for backing up a database or inserting a database.
- However, you must locate the mysqldump executable in order to perform this type of activity by opening a command line window.
- ** See the information further down this page to see how to use a batch file to perform database backups **
|
(Enlarge)
|
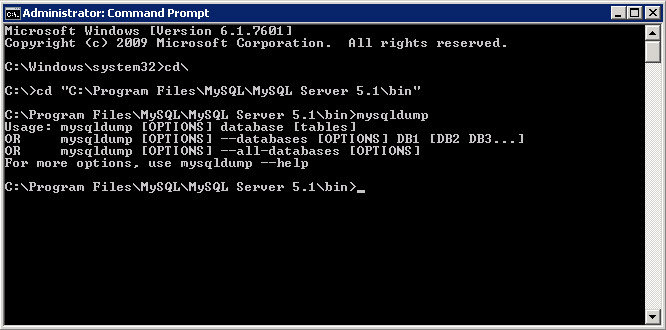
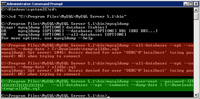
- Once open, go to the mysqldump executable:
- cd "C:\Program Files\MySQL\MySQL Server 5.1\bin"
|
(Enlarge)
|
- This screenshot shows how to dump (or "download") all of the databases and their content. The red indicates some failed attempts, while the green indicates a successful command - the big difference is, although you are running the command window in administrator mode, you don't have the permissions needed to run the command which is overcome by specifying the login and passowrd:
- mysqldump --user=root --password=thepassword --all-databases --opt --comments --dump-date > C:\all-databases-dumped-here.sql
|
|
--
|
- Now that you have mySQL installed, you may decide to perform backups of one or more databases. With Task Scheduler and a batch file, this is relatively easy to do. The example below illustrates a batch file which performs a backup of a database where the name of the .sql file is the date the backup occurred on:
REM set echo on in order to see output
echo off
REM Go where the mysqldump is located
cd "C:\Program Files\MySQL\MySQL Server 5.1\bin"
REM Get the date
for /f "tokens=1,2,3,4 delims=/ " %%a in ("%date%") do set wday=%%a&set month=%%b&set day=%%c&set year=%%d
REM Set the filename by date
set filename=%month%-%day%-%year%
REM Remove whitespace (not needed)
REM set filename=%filename: =%
REM Export the database
mysqldump --user=root --password=thepassword database_to_backup --opt --comments --dump-date > C:\Backups\%filename%.sql
REM uncomment pause in order to keep the window from closing
REM pause
NOTE: You may want to have the scheduled task run under the machine-name/system account...or a network account if you are copying data off of the server.
|
|
--
|
- With PHP installed you may have some sort of unique process to manage PHP pages and various content items (such as images or cache items). This batch file copies specific files and contents of folders to a newly created destination location that is named the date of the backup. Like the above, with task scheduler and a batch file it is relatively simple to backup specific files or folders and files:
echo off
REM Get the date
for /f "tokens=1,2,3,4 delims=/ " %%a in ("%date%") do set wday=%%a&set month=%%b&set day=%%c&set year=%%d
REM Set the backup folder name by date
set foldername=%month%-%day%-%year%
REM Set the destination folder path
set folderpath=C:\Backups\%foldername%
REM Remove whitespace (not needed)
REM set filename=%filename: =%
REM Copy a specific file
REM COPY /A /Y C:\inetpub\www.yoursite.com\index.php %folderpath%
REM Oops, that was intuitive so it cannot work
REM Must explicitly create the destination folder and then copy the file
MD %folderpath%
REM Now copy the file to the folder
COPY /A /Y C:\inetpub\www.yoursite.com\index.php %folderpath%
REM Copy a file from a folder on the site (don't want to copy all files/folders than may be present)
MD %folderpath%\somefolder
COPY /A /Y C:\inetpub\www.yoursite.com\somefolder\info.php %folderpath%\somefolder\info.php
REM Copy various images files from site (folders inside of images would be dynamically created so don't have to create them beforehand)
XCOPY C:\inetpub\www.yoursite.com\images %folderpath%\images /D /E /C /R /I /K /Y
|