Floppy Case
|
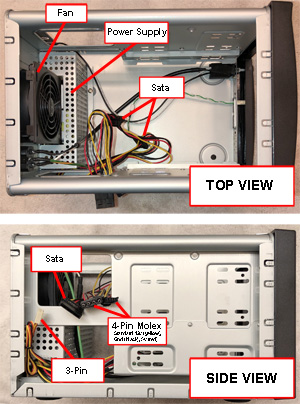
After the Copystar Dvd Duplicator 3-bay Tower arrived, like this one, I put a multimeter on the molex plugs to make sure the built-in power supply was working and that the molex pins had the voltages needed (12VDC, 5VDC)...nowadays you just never know; turns out the molex plugs were outputting the correct voltages at the correct pins. It also has other power plugs (SATA, etc) but in this application, those will not be used. |
|
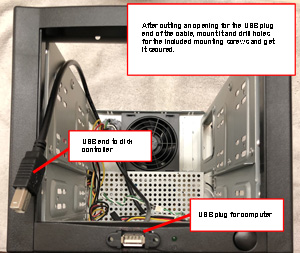
In order to connect the case to the computer via a USB cable (and so there are no cables poking out of the case), I used a 2-foot panel mount USB 2.0 A Female to B Male cable, like this one. The male end will plug into the disk controller.
In order to seat the female end into the bottom area of the case, as seen in the image, you'll need to cut out a piece to get it mounted and a drill for the mounting screws. Finally, bay #1 (the one closest to the USB cable) will have a 5.25 inch bay plastic drawer like this one. The USB and disk cable will go into the drawer and connect to the disk controller. NOTE: On the plastic drawer itelf you will need to cut out a portion of the back so you can feed the cabling through it. |
|
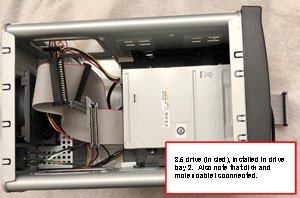
Next, insert the drive bay drawer frame (without the drawer) into the case and secure it.
After you have mounted the 3.5 inch diskette drive to a 5.25 inch bay sled (like the 3.5" to 5.25" Front Bay-Mounting Bracket), slide in and secure it in the second bay. Be sure to connect the molex and disk cable to the drive as it will become inaccessible once the 5.25 inch diskette drive is added. |
|
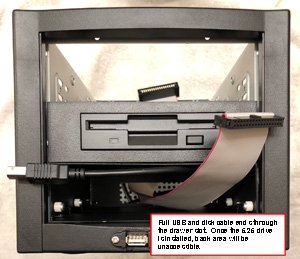
At this point, feed through the male USB cable end and the disk cable through bay slot 1 where the drawer will be used. You may want to cut out a portion in the back of the plastic drawer for the cables. |
|
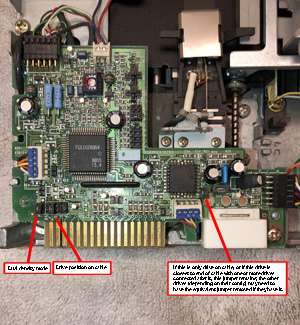
If you happen to have a Panasonic JU-475-4xx series 5.25 inch floppy diskette drive, there are some jumper locations that you might want to be aware of in case you need to change them around, as shown in the image. In my case, the jumper settings work for my needs. |
|
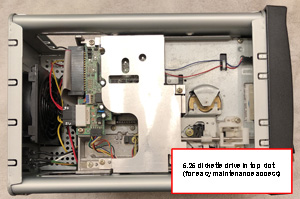
Now, slide in and secure the 5.25 inch floppy diskette drive into bay 3 (the top-most bay in the case), and connect the molex and disk cable.
The reason why I placed the 5.25 inch drive on the top of the bay stack is, if I need to change jumpers or need to work on the drive in the future (such as to clean the motor head assembly or related parts) I'll have easy access to the drive and won't have to remove it from the case. Pretty chill. |
|
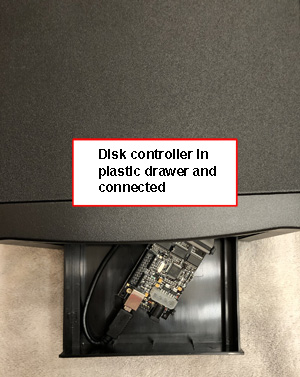
After plugging the usb and disk cables to the disk controller (in this case, KyroFlux) in the drawer (see image), everything is ready!
You may be wondering why I have the disk controller in the plastic drawer. The first reason is so that I can have easy access to it without busting open the case. And, the second reason is that if other disk controllers become available in the future (perhaps an all-in-one that can actually work with disk media without ripping and do emulation at the same time - so the end-user simply interacts like they do with files and executables on a computer today) I can simply unplug the current disk controller, plug in the new one, close the drawer and be ready for use. Extra Credit Question: Now that you've seen how I put together a case for different floppy diskette drives with a controller, you may have heard that there are external 3.5 inch disk drives that plug into a computer with a usb cable. I have one of those, like this one. Yet, for some reason, nothing like that is available for a 5.25 inch floppy diskette (or drive). So here's the question: Since you've seen that the 3.5 inch diskette drive uses the same cable as a 5.25 inch floppy diskette drive, has anyone tried to hack the 3.5 hardware so a 5.25 inch floppy diskette drive can be jacked into it? |
|
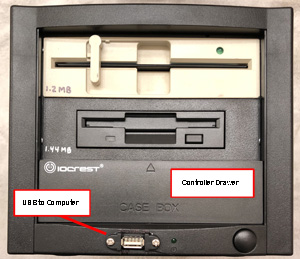
Here's the front-view image of the fully assembled case.
Awesome project! A few other notes of interest: 1. Depending on how the disk cable was connected to the drives (in my case, the 3.5 inch drive after the twist at the end of the cable, and the 5.25 inch drive before the twist (so closest to the disk controller)) are seen by the KyroFlux disk controller as Disk 0 (3.5 inch drive) and Disk 1 (5.25 inch drive). 2. While you can select which drive to work with via the GUI (the GUI requires java) to select the Drive, you can also use the DTC command-line. 3. Some example DTC commands to run from the command-line for calibration (track seek) which can also be used to clean the drive heads if you have a cleaner include: DTC -d0 -c2 (this will run calibrate on disk 0) DTC -d1 -c2 (this will run calibrate on disk 1) 4. With what I've found for 360KB and 1.2MB 5.25 inch floppy diskettes and the 5.25 inch drive, it is possible to use a 360KB diskette in a 5.25 inch drive. The first bit is to know the track information: 360KB Diskette = 40 tracks. Typically DS/DD (MF2-DD "LOW DENSITY"). Usually has a visible plastic white or black "hub" ring in the center. 1.2MB Diskette (or 1.44MB, 3.5 inch Diskette) = 80 tracks. Typically DS/HD (MF2-HD / MD-2HD "HIGH DENSITY"). Usually does not have a "hub" ring in the center. There may be a jumper on the board to make the switch for the media. Another option that is possible is that, for a 360KB diskette, the HEAD STEP can be set to 2. That said, that may not cover all media types, such as some niche format, but this has worked for what I've come across. Speaking of that, diskettes of 720KB (DS/QD) typically are read as 360KB per side. |
