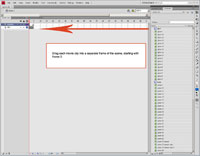
| STEP 1 |
(Enlarge) |
- Drag each movie clip into a separate frame of the scene, starting with frame 2.
|
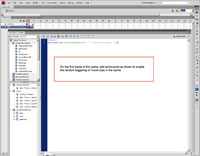
| STEP 2 |
(Enlarge) |
- On the first frame of the scene, add actionscript as shown to enable the random triggering of movie clips in the scene.
|
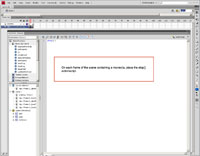
| STEP 3 |
(Enlarge) |
- On each frame of the scene containing a movie clip, plase the stop() actionscript function.
|
| STEP 4 |

(Enlarge) |
- Don't forget to provide a name for each frame of the scene so that they can be intuitively referenced.
|
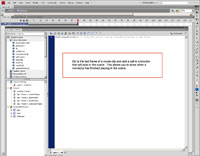
| STEP 5 |
(Enlarge) |
- Go into each movie clip. Go to the last frame of a movie clip and add a call to a function that will exist in the scene. This allows you to have the movie clip signal when it is done playing.
|
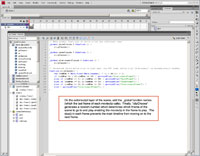
| STEP 6 |
(Enlarge) |
- On the actionscript layer of the scene, add the _global function names (which the last name of each movie clip calls). Finally, "clipChoose" (in this example) generates a random number which determines which frame of the scene to go to and play; this enables the movie clip in the frame to play. The stop() function in each frame prevents the main timeline from moving on to the next frame.
|


