Purpose
The purpose of this project is to cover some of the fundamentals of working with Amazon EC2 and RDS as well as issuing access to an IAM user to be able to access an EC2 instance (handy when you have multiple users but don't want them to have access to your main AWS account).
(Enlarge)
|
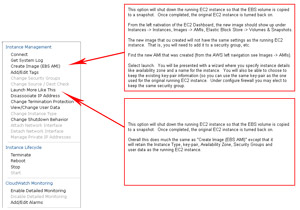
- CLONING:
- A running EC2 instance (usually where your website is at) may be "cloned" or made into an additional AMI Image.
- The first is "Create Image (EBS AMI)" where a clone or "backup" is created but does not share most of the settings that the running instance may have. The second one, "Launch more like this" does retain the settings which could be used in a Cloud Formation setup along side a load-balancer allowing web traffic to be distributed across instances as needed (by thresholds you specify).
|
(Enlarge)
|
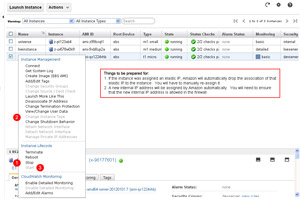
- CHANGING INSTANCE TYPE SIZE:
- The size of an EC2 Instance may be changed. For example, say you need to "upgrade" from the micro instance with 600MB RAM to something bigger.
- While it is a three step process as shown, there is a caveat - at least with a non-Amazon AMI. That is, if you have assigned an Elastic IP (static, public IP address) to the instance, the change of instance type will cause the elastic IP address to automatically become dis-associated from the instance (you will have to manually re-add it). As well, the internal IP address of the instance will automatically change (so you will have to manually add the internal IP address).
- Finally, after the instance type upgrade it will not be assigned a subnet ID as normally seen in the AWS EC2 control panel...so if the instance was connected to RDS via the DB Subnet Groups, more than likely it won't be after the instance type change.
- Probably the best option would be to clone or "backup" the EC2 instance and change the instance type size of that clone / backup and then swap external IP address, etc from the original EC2 Instance to the clone.
|
(Enlarge)
|
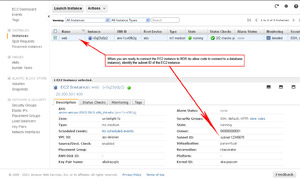
- CONNECTING EC2 TO RDS (Step 1):
- Connecting an EC2 instance to RDS (so it can communicate with a database) is pretty straight-forward. Essentially what you need is the subnet ID of the EC2 instance as shown here.
|
(Enlarge)
|
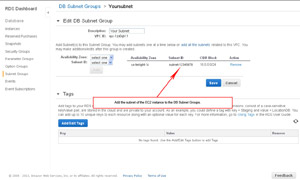
- CONNECTING EC2 TO RDS (Step 2):
- Then locate the subnet ID in RDS under DB Subnet Groups and add it.
|
(Enlarge)
|
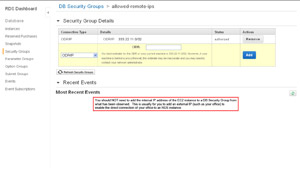
- CONNECTING EC2 TO RDS (Step 3 - Umm, no):
- Unless there's really something unique going on with how things are setup, it is a misnomer to think that the internal IP address of the EC2 instance needs to be added to the DB Security Groups. Usually this is used to specify external IP addresses that you want to allow to connect directly to one or more database instances in RDS (such as an office location) if VPN VPC is not setup, you cannot SSH tunnel to an EC2 instance and then to RDS, etc.
|
(Enlarge)
|
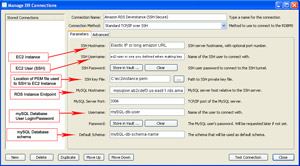
- CONNECTING MYSQL WORKBENCH TO RDS:
- Connecting directly to RDS over regular TCP/IP is not usually recommended because the mySQL credentials you pass to connect are sent in clear-text from wherever you are to the RDS instance. Sure, its great if you are restricting access via IP, but those credentials are out there for anyone to grab. With a little research they may find an sql-injectable access point on your website, or a bit more sleuthy, gain access to your network. At that point its game-over. Pawned...hope you didn't want to keep anything confidential like trade-secrets, etc.
- If you do not have a VPN VPC setup, you can still secure mySQL's Workbench connection to RDS. As shown by the image, is accomplished by having an SSH tunnel setup to an EC2 instance which is connected to RDS.
- The alternative is detailed in the next section where you use mySQL Workbench over TCP/IP but you encrypt the data with SSL.
|
(Enlarge)
|
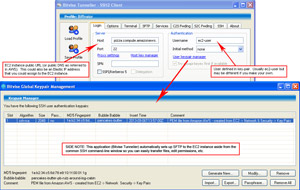
- CONNECTING TO EC2 INSTANCE:
- Connecting to an EC2 instance via SSH is similar to mySQL Workbench. See the image. In this example Bitvise Tunnelier is utilized since it is like putty for the command-line prompt, but it also automatically loads SFTP in a GUI so you can easily transfer files, change permissions and so on.
|
Connect to RDS From mySQL Workbench over SSL
(Enlarge)
|
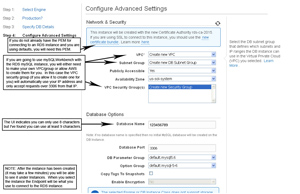
- When you create a new RDS Instance you are given the opportunity to download the PEM file.
- You need to save this PEM to your computer so you can use it later for the mySQL Connection using SSL.
|
(Enlarge)
|
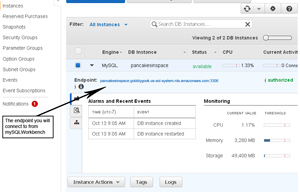
- After the RDS Instance is created (may take a few minutes) it will be in your Instance list. Copy the endpoint that you will use to connect to it with.
|
(Enlarge)
|
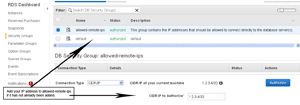
- If you have not done so, you will need to add the IP address of your connection to the remote IP list in order to get mySQL Workbench to successfully connect to the RDS Instance.
|
(Enlarge)
|
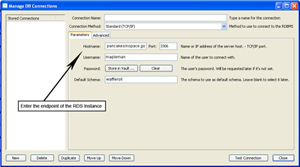
- In mySQL Workbench you will need to create a connection for the RDS Instance. For the Hostname enter the endpoint of the RDS Instance and then enter the basic database information for your database.
|
(Enlarge)
|
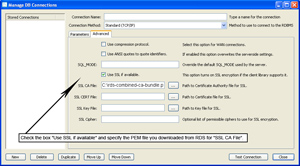
- Under the advanced tab you will need to check "Use SSL if available".
- Under "SSL CA File" you will need to point to the PEM file that you downloaded earlier.
|
(Enlarge)
|
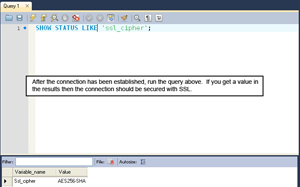
- Once mySQL Workbench is connected you can check the status of the connection (to ensure it is using SSL). An alternative is to enter the command below into the query window and execute it:
SHOW STATUS LIKE 'ssl_cipher';
|
IAM User Policy To Access EC2 Instances in a Region
IAM policy to allow users attached to this policy (either by adding to the user or the group the user is in) to access EC2 in a particular region. By default a user is denied access to anything that they are not explicitly granted access to. In this example you are granting IAM users (who've been added to the policy) access to EC2 in a particular region of "us-east-4":
{
    "Version": "2012-10-17",
    "Statement": [
        {
            "Action": "ec2:*",
            "Effect": "Allow",
            "Resource": "*",
            "Condition": {
                "StringEquals": {
                    "ec2:Region": "us-east-4"
                }
            }
        }
    ]
}


